Support FAQ
Photo Management
You have full control of the photos that are on your account. You can easy move them between your public album, private album or even put them in your own album. If you'd like to change the order of the photos, you can simply do this. Furthermore, you can choose which photo you'd like to use as your profile photo and album cover photo. If you're not happy with the photo, you can use the edit tools (membership dependant) or delete the photo altogether.
Photo management section
To enter your photo management section, click your username from the top menu followed by Photos.

Moving a photo to a different album
If you would like to move a photo from a different album, for example from your public album to your private album, you can do this incredibly easily. Simply mouse click onto the photo that you'd like to move and then place it over the album where you'd like it moved to.

The process should confirm that the move is complete.
Creating a new album
If you would like to create a new album for your photos to be held in, you can do so. In your photo management section, choose Create Album

In the prompt that appears, type in a name for your new album. If you would like the album to be private, accessible by only those who you've granted access to, make sure that you tick the 'Private' box.

Once you are happy with the new album options, select Create.

Your new album has now been created. You can start putting photos in the new album immediately.
Changing the order of your photos
By default the website will order your photos from newest to oldest. However if you prefer to other them otherwise, you can do so.
To change a photo's position, simply select it and then drag it into the respective position.

You should then see confirmation that the photo has been updated.
Setting a profile photo, album cover or forum avatar
Note - the website only allows non-adult photos that are in public albums to be used as profile photos. We describe non-adult as something that you'd see in a newspaper. Photos that show genitals, penetration, or the pubic area are all classed as adult material and cannot be used as a profile photo.
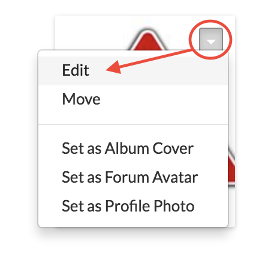
Each photo has a down arrow menu icon in the top right corner that when clicked, will show management options. For the photo that you'd like to use as your profile photo, album cover or forum avatar, click to open this menu and choose the respective option, such as Set as Profile Photo.

Provided the photo is suitable (non-adult and public for profile photos as explained above), you should find that the photo is now set.
Blurring a photo
If there's something that you'd like to blur out of your photo, you can use the website photo editing tools to do this. This option though is membership dependant, so if you find that you can't use this, you may need to consider upgrading your membership.
Each photo has a down arrow menu icon in the top right corner that when clicked, will show management options. For the photo that you'd like to use as your profile photo, click to open this menu and choose Edit.
From the top menu, choose the Edit option.

Again from the top menu, choose the Blur option.

Use the blur selector to move and adjust to cover the area of the photo that you would like to blur

Once you are happy, from the top menu, choose the Blur Selection option.

Save the blur action by selecting from the top menu Save.

The blur process is now complete.
Rotating a photo
If there's a photo that you'd like to rotate, you can use the website photo editing tools to do this. This option though is membership dependant, so if you find that you can't use this, you may need to consider upgrading your membership.
Each photo has a down arrow menu icon in the top right corner that when clicked, will show management options. For the photo that you'd like to use as your profile photo, click to open this menu and choose Edit.
From the top menu, choose the Edit option.
Again from the top menu, choose the Rotate option.

Save the rotate action by selecting from the top menu Save.
The rotate process is now complete.
Add or modify the photo description
You can add a photo description which other members can see when viewing the photo. Sometimes members use this to write when the photo was taken or encourage comments from others.
On the photo that you'd like to add or modify a description on, click the arrow menu icon to open the management menu and choose Edit.
From the top menu, choose Description.

Enter the description that you'd like to add to the photo or change the description if you already have one, followed by selecting Save.

Adding or modifying the photo description is now complete.
Removing a photo from the public gallery
If you would like to remove a photo from the public gallery but still make it accessible to members who view your profile, you can do so.
On the photo that you'd like to remove from the gallery, click the arrow menu icon to open the management menu and choose Edit.
From the top menu, choose Manage.

Again from the top menu, choose No Gallery.

This process is now complete.
Deleting a photo
Deleting a photo will remove it from being accessible on your profile.
On the photo that you'd like to remove from the gallery, click the arrow menu icon to open the management menu and choose Edit.
From the top menu, choose Manage.
Again from the top menu, choose Delete.
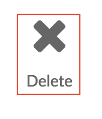
Confirm the action in the confirmation prompt by selecting OK.

The photo has now been deleted from your profile.